Hướng dẫn chi tiết lắp điện năng lượng mặt trời tại nhà
Tóm tắt nhanh:
- Hệ thống điện mặt trời là một giải pháp sử dụng không gian trống trên sân thượng, mái nhà,…nơi có nhiều ánh sáng mặt trời để lắp đặt các tấm pin năng lượng mặt trời.
- Lắp điện năng lượng mặt trời tại nhà giúp tiết kiệm chi phí điện, tận dụng mái nhà và bảo vệ môi trường.
- Hệ thống gồm 3 loại chính: hòa lưới (phổ biến), độc lập (có pin lưu trữ), và hybrid (kết hợp cả hai).
- Mái tôn là vị trí lắp đặt tối ưu nhờ thi công nhanh, chi phí thấp và hiệu quả hấp thụ nắng tốt.
- Quy trình lắp đặt gồm: chuẩn bị công cụ, khảo sát vị trí, lắp khung đỡ, gắn tấm pin, đấu nối hệ thống và kết nối inverter.
- Cần đảm bảo yếu tố kỹ thuật như hướng đón nắng, tránh che bóng, dùng vật liệu đạt chuẩn và an toàn điện.
- Chi phí lắp đặt năm 2026 dao động khoảng 10–20 triệu/kWp, tùy thiết bị và quy mô hệ thống.
- Nếu lắp đúng kỹ thuật, hệ thống có thể hoàn vốn trong khoảng 5–7 năm và sử dụng ổn định lâu dài.
Điện năng lượng mặt trời đang ngày càng trở thành lựa chọn phổ biến tại Việt Nam nhờ vào khả năng tiết kiệm chi phí lâu dài và bảo vệ môi trường. Tuy nhiên, để quyết định đầu tư vào hệ thống điện mặt trời, bạn cần hiểu rõ về bảng giá chi phí lắp điện năng lượng mặt trời cho năm 2026. Trong bài viết này, chúng tôi sẽ cung cấp thông tin chi tiết về các chi phí liên quan đến việc lắp đặt hệ thống năng lượng mặt trời, từ giá thiết bị, chi phí lắp đặt đến các dịch vụ bảo trì và bảo dưỡng, giúp bạn có cái nhìn rõ ràng và chuẩn bị ngân sách phù hợp.
1. Hệ thống điện mặt trời là gì?
Hệ thống điện mặt trời là một giải pháp sử dụng không gian trống trên sân thượng, mái nhà hoặc các vị trí có nhiều ánh sáng mặt trời để lắp đặt các tấm pin năng lượng mặt trời. Hệ thống này tận dụng nguồn năng lượng tái tạo, sạch từ ánh sáng mặt trời để tạo ra điện năng phục vụ sinh hoạt và sản xuất.
Các mô hình hệ thống điện mặt trời mái nhà phổ biến
Hiện nay, hệ thống điện mặt trời mái nhà được chia thành ba mô hình chính như sau:
-
Hệ thống điện mặt trời độc lập (Off-grid): Trong mô hình này, các tấm pin sẽ hấp thụ ánh sáng mặt trời và chuyển đổi thành điện năng một chiều (DC). Điện năng này được lưu trữ trong ắc quy để sử dụng khi cần, đặc biệt phù hợp với khu vực địa hình hiểm trở, không có lưới điện quốc gia như vùng núi, đảo xa.
-
Hệ thống điện mặt trời hòa lưới (Grid-tied): Đây là mô hình phổ biến nhất hiện nay tại Việt Nam. Dòng điện DC từ tấm pin được biến đổi thành điện xoay chiều (AC) qua biến tần (inverter) với tần số và công suất tương thích lưới điện quốc gia. Điện sinh ra dùng cho các thiết bị trong nhà; nếu lượng điện dư, hệ thống sẽ đẩy điện ra lưới quốc gia và được ghi nhận bằng đồng hồ đo hai chiều để hưởng các chính sách bán điện.
-
Hệ thống điện mặt trời hỗn hợp (Hybrid): Là sự kết hợp giữa hai mô hình trên. Điện từ pin mặt trời sẽ ưu tiên sạc đầy hệ thống pin, khi pin đầy, điện tiếp tục được chuyển đổi thành AC để sử dụng hoặc hòa vào lưới điện. Trong cấu hình này, việc đầu tư một bộ lưu trữ điện năng lượng mặt trời chất lượng cao là yếu tố cốt lõi giúp điều phối nguồn điện an toàn. Khi hệ thống không đủ điện, biến tần sẽ chủ động lấy điện từ lưới quốc gia hoặc từ bộ lưu trữ dự phòng này.
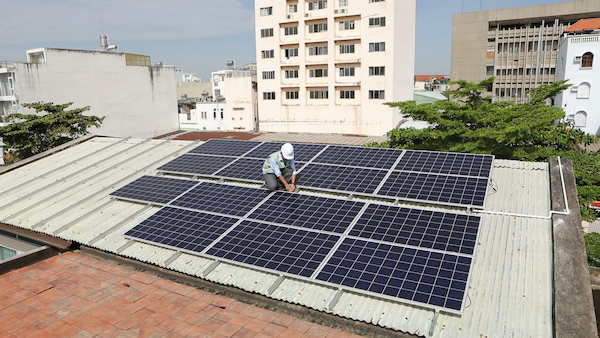
2. Lắp điện năng lượng mặt trời trên mái tôn là như thế nào?
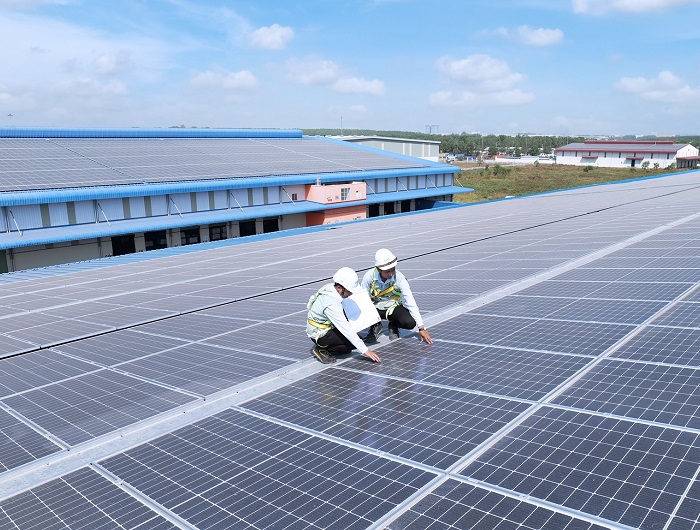
Việc lắp đặt điện năng lượng mặt trời trên mái tôn là quá trình gắn các tấm pin song song theo mặt mái tôn, thường ở vị trí cao nhất để tối đa hóa khả năng hấp thu ánh sáng. Hệ thống này hoạt động bằng cách chuyển đổi năng lượng ánh sáng mặt trời thành điện năng để sử dụng hoặc hòa lưới.
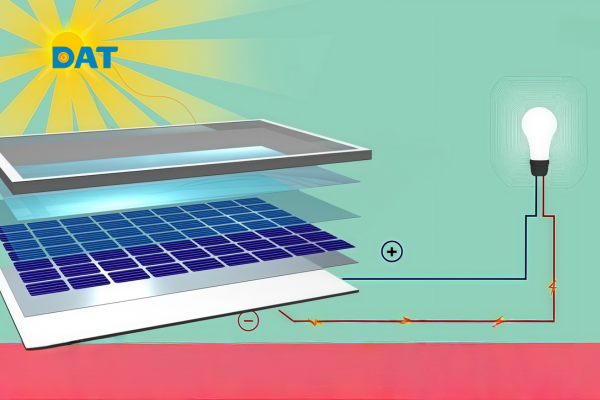
2.1 Nguyên lý hoạt động
Tấm pin mặt trời hấp thu photon ánh sáng, tạo ra dòng điện một chiều (DC). Dòng điện này sẽ được biến tần (inverter) chuyển thành dòng điện xoay chiều (AC) để sử dụng trong gia đình hoặc hòa lưới điện. Một trong những dòng inverter 8kW phổ biến và đáng tin cậy là sản phẩm của Sungrow, đáp ứng tốt công suất vừa và lớn cho giàn năng lượng mặt trời hiện nay.
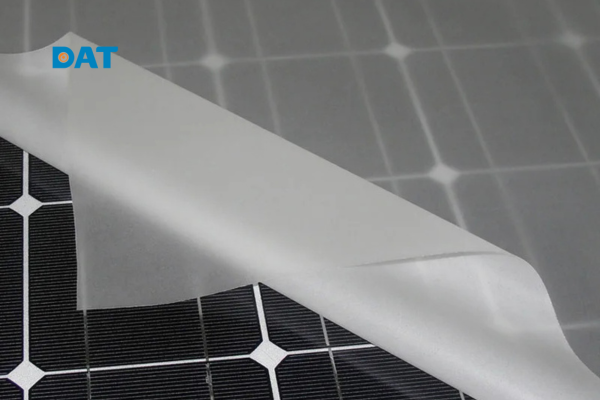
2.2. Các loại tấm pin phổ biến hiện nay
| Loại pin | Ưu điểm | Nhược điểm | Ví dụ ứng dụng |
|---|---|---|---|
| Monocrystalline | Hiệu suất cao (~22%), tuổi thọ dài, nhỏ gọn | Giá cao, hiệu quả giảm nhẹ ở nhiệt độ cao | Nhà ở, doanh nghiệp cao cấp |
| Polycrystalline | Giá thành thấp, hiệu suất ổn định (~15-17%) | Kích thước lớn hơn, ít hiệu quả hơn | Lắp đặt diện tích lớn, chi phí thấp |
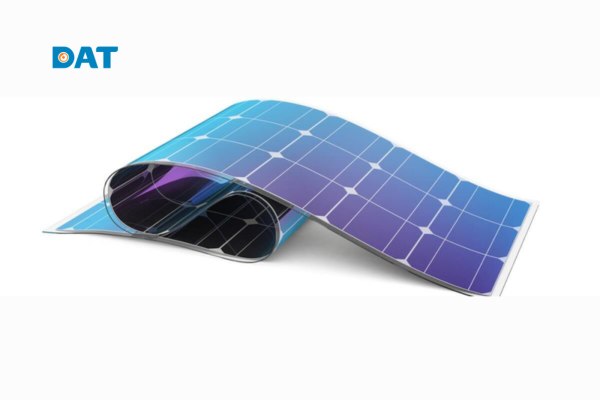
| Thin-film | Linh hoạt, nhẹ, dễ lắp đặt, giá thấp | Hiệu suất thấp (~10-12%), tuổi thọ ngắn | Ứng dụng đặc biệt, không gian hạn chế |
Ý kiến cá nhân: Monocrystalline là lựa chọn tối ưu về lâu dài với hiệu suất cao và bền bỉ, nhưng chi phí ban đầu cao. Với các dự án gia đình hoặc doanh nghiệp nhỏ, nên cân nhắc Polycrystalline để tiết kiệm chi phí.
3. Vì sao nên lắp pin mặt trời trên mái tôn?
Nhiều người đặt câu hỏi liệu có thể lắp điện mặt trời trên mái tôn và có nên thực hiện hay không. Câu trả lời là có thể và nên làm, bởi nhiều lợi ích thiết thực:
3.1. Có thể lắp điện mặt trời trên mái tôn không?
Mái tôn là một trong ba loại mái nhà phổ biến tại Việt Nam (cùng với mái bằng và mái ngói). Trong số này, mái tôn được đánh giá là dễ dàng nhất cho việc lắp đặt tấm pin năng lượng mặt trời do kết cấu nhẹ, khả năng chịu lực tốt và thi công nhanh chóng.
3.2. Lợi ích khi lắp điện mặt trời trên mái tôn
- Chống nóng hiệu quả: Mái tôn thường hấp thụ và truyền nhiệt mạnh, làm không gian bên dưới nóng bức, đặc biệt mùa hè. Lắp tấm pin mặt trời trên mái tôn giúp hấp thụ năng lượng mặt trời, đồng thời phản xạ lại một phần nhiệt, giảm nhiệt độ bên dưới mái từ 2 – 10 độ C theo các số liệu đo đạc thực tế.
- Tăng khả năng chống bão: Mái tôn mỏng, dễ bị gió bão thổi bật nếu không được cố định chắc chắn. Hệ thống tấm pin và giàn khung đỡ không chỉ gia cố thêm cho mái mà còn tăng trọng lượng, giúp mái tôn bền vững hơn trước tác động của gió mạnh. Các tấm pin đạt tiêu chuẩn IP cao, chịu được thời tiết khắc nghiệt và lực ngoại tác tốt, góp phần tăng độ bền công trình.
- Tính thẩm mỹ hiện đại: Lắp pin mặt trời trên mái tôn biến mái nhà trở nên hiện đại, sang trọng với thiết kế tấm pin bóng bẩy, thanh lịch. Điều này nâng cao giá trị thẩm mỹ và giá trị bất động sản của công trình.
- Dễ dàng lắp đặt và bảo trì: So với mái ngói hoặc mái bằng, mái tôn cho phép thi công nhanh, ít ảnh hưởng đến kết cấu hiện có, tiết kiệm thời gian và chi phí lắp đặt. Hệ thống cũng dễ dàng vệ sinh, bảo trì.
- Sử dụng điện năng miễn phí, bền vững: Sau khi đầu tư ban đầu, điện sản xuất từ năng lượng mặt trời là miễn phí, giúp giảm hóa đơn tiền điện, thậm chí có thể bán điện dư thừa cho lưới điện quốc gia, mang lại lợi ích kinh tế lâu dài.
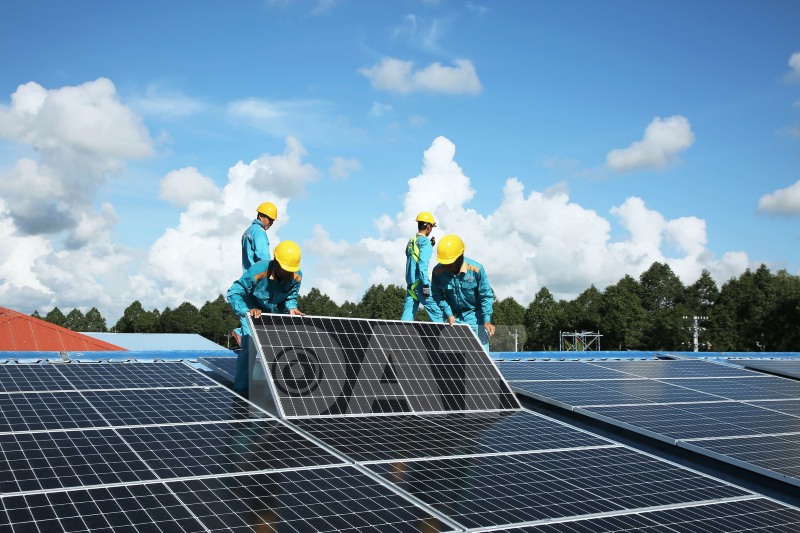
4. Hướng dẫn quy trình lắp đặt điện năng lượng mặt trời trên mái tôn
4.1. Chuẩn bị dụng cụ thi công và bảo hộ an toàn lao động
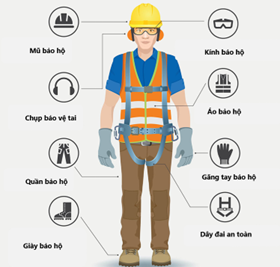
An toàn lao động trong quá trình thi công là một phần quan trọng và không thể thiếu của mọi dự án xây dựng hoặc công trình lắp đặt điện mặt trời. Việc tuân thủ các quy tắc an toàn giúp bảo vệ sức khỏe và tính mạng của công nhân và người tham gia dự án. Dưới đây là một số trang thiết bị quan trọng để đảm bảo an toàn lao động trong quá trình thi công: Giày bảo hộ, nón bảo hộ, áo bảo hộ, dây đai an toàn, kính bảo hộ, nút bịt tai…
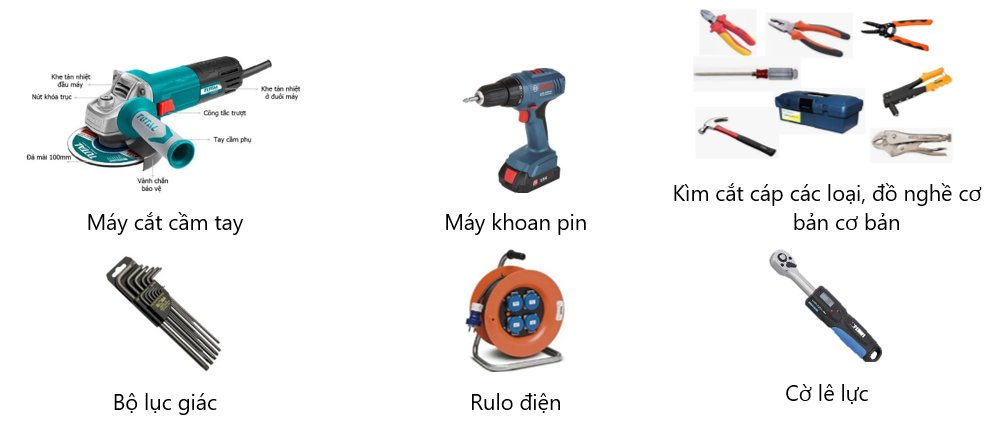
Bộ dụng cụ đồ nghề cơ bản để phục vụ thi công: máy cắt, máy khoan pin, lục giác, đồ nghề điện cơ bản bao gồm:
4.2. Lựa chọn vị trí lắp đặt mái năng lượng mặt trời
Lựa chọn vị trí lắp đặt mái năng lượng mặt trời là một yếu tố quan trọng để đảm bảo hiệu suất tối đa của hệ thống. Dưới đây là một số yếu tố cần xem xét khi lựa chọn vị trí lắp đặt:
+ Hướng và góc nghiêng: Vị trí lắp đặt tấm pin nên được đặt ở vị trí nhận ánh sáng mặt trời tối đa. Điều này đòi hỏi xác định hướng và góc nghiêng tối ưu của tấm pin. Ở bán cầu Bắc, hướng tốt nhất là hướng về phía Nam, với góc nghiêng xấp xỉ bằng với vĩ độ địa phương. Tuy nhiên, điều này có thể thay đổi tùy thuộc vào vị trí địa lý cụ thể của bạn.
+ Ánh sáng mặt trời không bị che khuất: Vị trí lắp đặt mái năng lượng mặt trời cần đảm bảo rằng chúng không bị che khuất bởi cây cối, tòa nhà hoặc các cấu trúc khác trong suốt thời gian hoạt động của mặt trời. Bất kỳ che khuất nào có thể làm giảm hiệu suất của giàn năng lượng mặt trời.
+ Kết cấu hỗ trợ và độ bền: Vị trí lắp đặt cần có đủ không gian để lắp đặt các kết cấu hỗ trợ như khung gắn tấm pin và hệ thống lắp đặt. Đảm bảo rằng các kết cấu này được lắp đặt chắc chắn và có khả năng chịu đựng các điều kiện thời tiết khắc nghiệt như gió mạnh hoặc tuyết.
+ Hạn chế bị che bóng: Tránh vị trí lắp đặt tấm pin nằm trong khu vực có bóng râm. Bất kỳ bóng râm nào phủ lên mái năng lượng mặt trời sẽ làm giảm hiệu suất hoạt động và khả năng sản xuất năng lượng của hệ thống.

+ Vận hành và bảo trì: Hãy xem xét việc lắp đặt tấm pin trong một vị trí dễ tiếp cận để thực hiện các hoạt động bảo trì định kỳ như làm sạch tấm pin và kiểm tra hệ thống. Việc có bảo trì dễ dàng sẽ giúp duy trì và tối ưu hóa hiệu suất của toàn hệ thống.
4.3. Hướng dẫn lắp đặt khung điện năng lượng mặt trời áp mái
Hiện nay việc lắp đặt điện mặt trời áp mái rất thông dụng, tuy nhiên cần tuân thủ một số yêu cầu lắp đặt sau:
+ Chất liệu và chất lượng: Nên chọn giàn khung đỡ được làm từ vật liệu chất lượng cao, chịu được tác động của môi trường và thời tiết. Thép không gỉ hoặc hợp kim nhôm thường được sử dụng vì chúng có độ bền cao và khả năng chống ăn mòn tốt.
+ Tính ổn định: Giàn khung đỡ cần có độ ổn định cao để chịu được tác động từ gió, mưa và tải trọng tấm pin. Nó cần được thiết kế và lắp đặt sao cho có khả năng chịu được các yếu tố môi trường khắc nghiệt và giữ cho tấm pin năng lượng mặt trời ở vị trí cố định.
+ Phân phối tải trọng: Giàn khung đỡ cần được thiết kế để phân phối tải trọng đều trên mặt áp mái. Điều này đảm bảo sự ổn định và tránh tình trạng tập trung tải trọng chỉ ở một điểm duy nhất, gây hỏng hóc hoặc thiệt hại cho áp mái.
+ Tiêu chuẩn an toàn: Khi lắp đặt giàn khung đỡ, cần tuân thủ các tiêu chuẩn an toàn định sẵn. Đảm bảo hệ thống đáp ứng các quy định về cách điện, chống sét và an toàn lao động để tránh rủi ro về điện, cháy nổ và tai nạn lao động.
+ Kiểm tra và bảo trì: Hãy thực hiện kiểm tra định kỳ và bảo trì giàn khung đỡ để đảm bảo tính ổn định và an toàn. Kiểm tra các mối nối, vít và các thành phần khác để đảm bảo rằng chúng không bị mòn hoặc lỏng.
+ Tuân thủ quy định địa phương: Luôn tuân thủ các quy định và quy định địa phương liên quan đến việc lắp đặt giàn khung đỡ tấm pin năng lượng mặt trời. Cần xem xét các yêu cầu pháp lý, bảo vệ môi trường và an toàn công trình khi thực hiện lắp đặt.
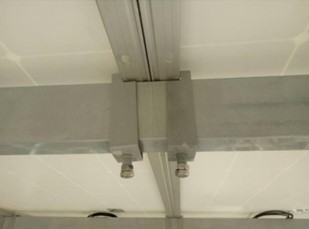
4.4. Lắp đặt giàn khung điện năng lượng mặt trời trên mái tôn sóng vuông
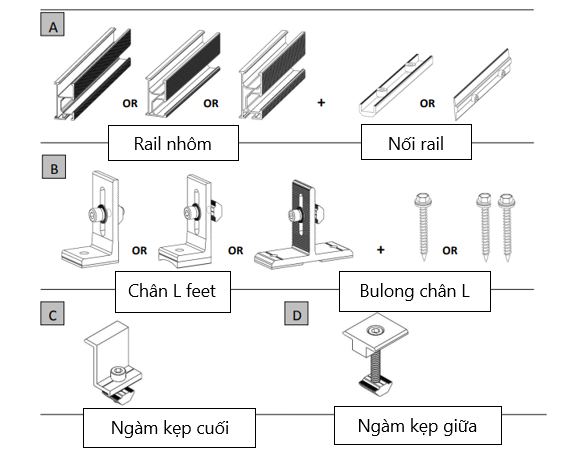
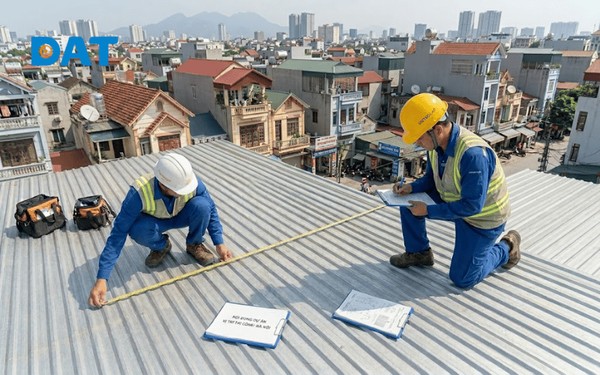
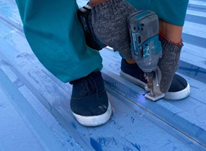
Bước 1: Kiểm tra kích thước mặt bằng thực tế và bản vẽ, tiến hành đánh dấu vị trí lắp đặt chân L feet. Vị trí chân L feet phải được liên kết với xà gồ mái.
Bước 2: Dùng máy bắn vít đầu M8 bulong B2stek và chân L feet vào vị trí đã lấy dấu.
Bước 3: Kết hợp các loại phụ gia chống thấm loại keo silicon đa năng ngoài trời bôi vào bên dưới mặt tiếp xúc chân L feet và mái tôn.
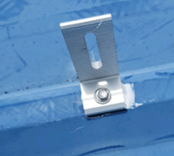
Vít bắt chân L feet phải sử dụng loại vít tự khoan mạ kẽm để chống ăn mòn (ví dụ: vít B2Stek), không sử dụng loại vít thép.
Bước 4: Lắp đặt rail nhôm. Rail nhôm liên kết với chân đỡ L feet bằng bộ bulong chuyên dụng.
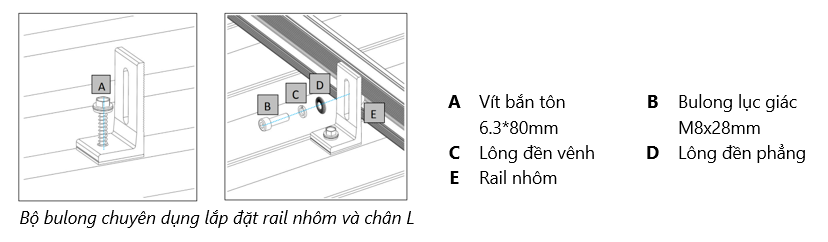 Rail nhôm lắp đặt phải cao hơn chân L feet, đồng thời lực siết của bulong phải đảm bảo đúng với tiêu chuẩn kỹ thuật của nhà cung cấp (12-14Nm).

4.5. Lắp đặt điện năng lượng mặt trời
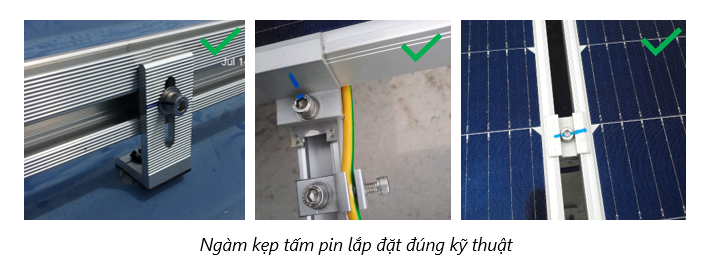
Kích thước phù hợp với độ dày tấm pin để lắp đặt cố đính tấm pin năng lượng mặt trời với hệ thống khung rail nhôm. Các ngàm sử dụng ngàm kẹp giữa và ngàm kẹp cuối có kẹp cần siết lực theo khuyến cáo của Nhà sản xuất khung rail và Nhà sản xuất tấm pin. Các ốc siết lực cần được dánh dấu marking để đảm tất cả các ốc đều được siết lực và không bị sót trong quá trình thi công.
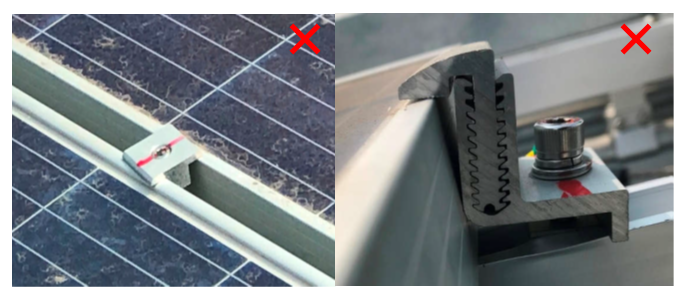 Ngàm kẹp tấm pin lắp đặt sai kỹ thuật
** Cảnh báo: Hiện tại trên thị trường có nhiều ngàm kẹp tấm pin “tự chế”, không đúng với tiêu chuẩn kỹ thuật của nhà sản xuất, khuyến cáo không nên sử dụng các loại ngàm kẹp này!!!
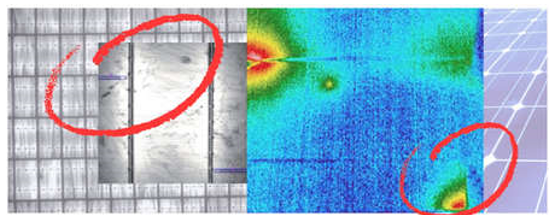
Trong quá trình thi công lắp đặt, không được phép thao tác dẫm, đạp, ngồi lên bề mặt mái năng lượng mặt trời.

Việc dẫm đạp lên tấm pin có thể gây ra hiện tượng micro-crack (nứt cell pin), gây ra hiện tượng hot spot, làm hỏng tấm pin.
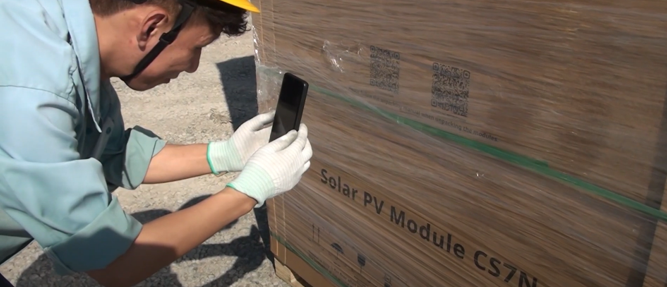
Việc lắp, vận chuyển và đặt tấm pin năng lượng mặt trời cần căn cứ vào tài liệu hướng dẫn lắp đặt của đơn vị sản xuất tấm pin để đưa ra phương án lắp đặt cho phù hợp. Trong đó, các vị trí chịu lực của tấm pin ảnh hưởng trực tiếp đến khả năng chịu tải trọng và mức độ ảnh hưởng của tấm pin trong các điều kiện thời tiết. Có thể quét mã QR ở trên thùng pallet tấm pin để truy cập đến hướng dẫn lắp đặt chính xác và mới nhất của NSX tấm pin.
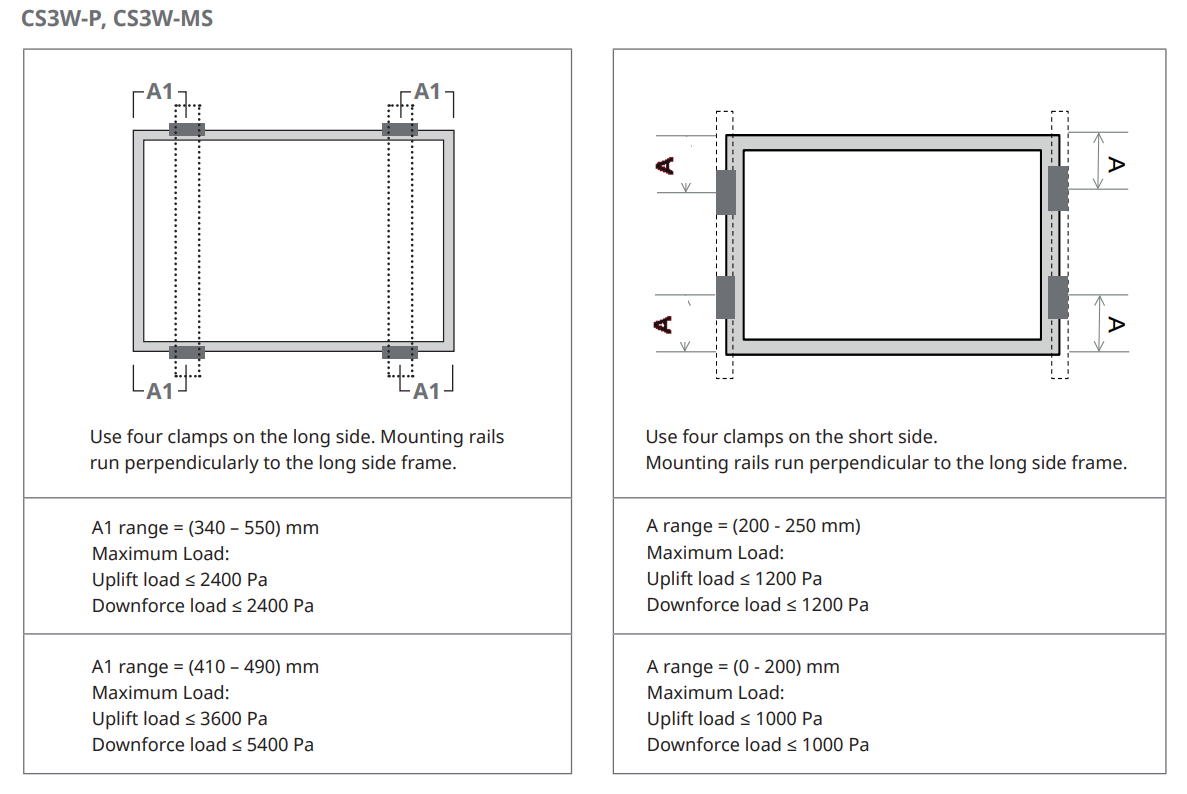
Lấy ví dụ tấm pin CS3W-440MS của Canadian Solar. Theo tài liệu hướng dẫn của hãng khi lắp đặt rail nhôm song song với cạnh ngắn của tấm pin. Khoảng cách từ vị trí rail nhôm và mép pin là A1, khoảng A1 tối ưu là 410 – 490mm, tấm pin sẽ chịu được lực tối đa đến 5400 Pa.
4.6. Kết nối hệ thống
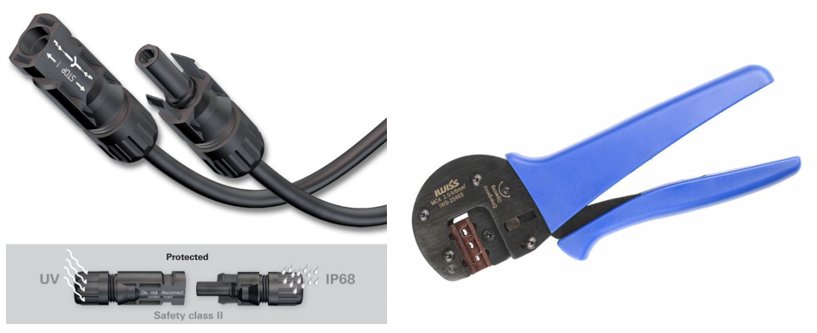
Các tấm pin năng lượng mặt trời được đấu nối tiếp với nhau thành từng chuỗi. Tiêu chuẩn kết nối các tấm pin phải đảm bảo tiêu chuẩn chống nước (IP 68), đảm bảo khả năng hoạt động trong suốt vòng đời. Các chuẩn kết nối thường dùng là MC4, T4… Tại vị trí 2 đầu của dãy pin, khi đấu nối với 2 cực của dãy phải sử dụng bộ đầu nối MC4 chuyên dụng và kềm chuyên dụng MC4 cho việc thi công.
Tùy thuộc vào thông số kỹ thuật tấm pin và điện áp hoạt động của inverter mà số lượng các tấm pin nối tiếp khác nhau nhưng sẽ được đấu nối theo các cách sau đây.
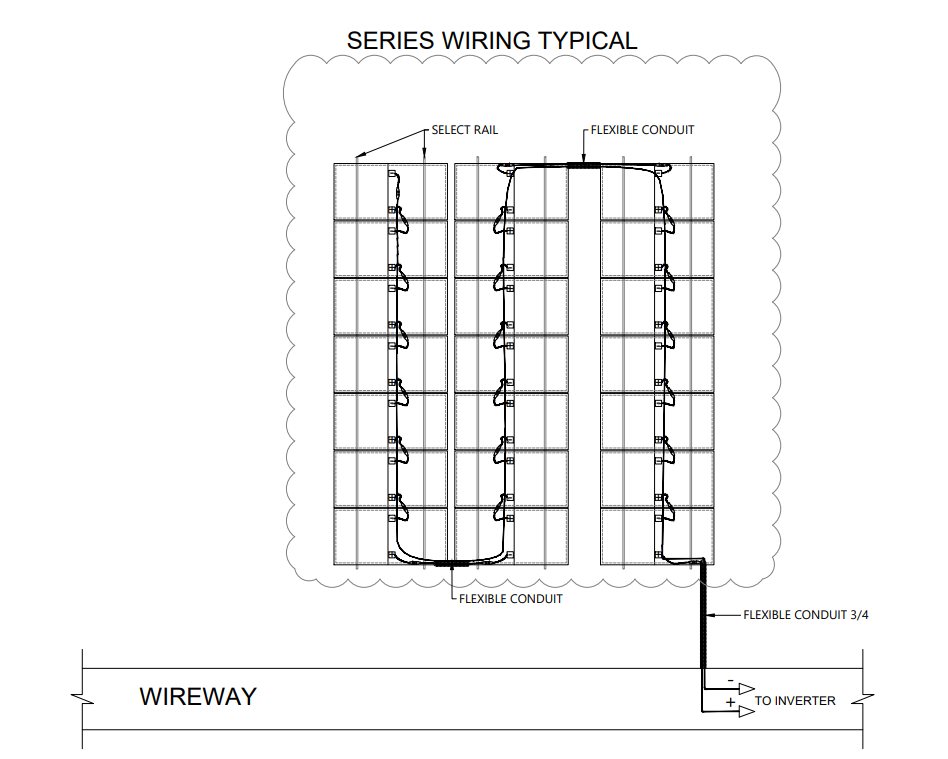
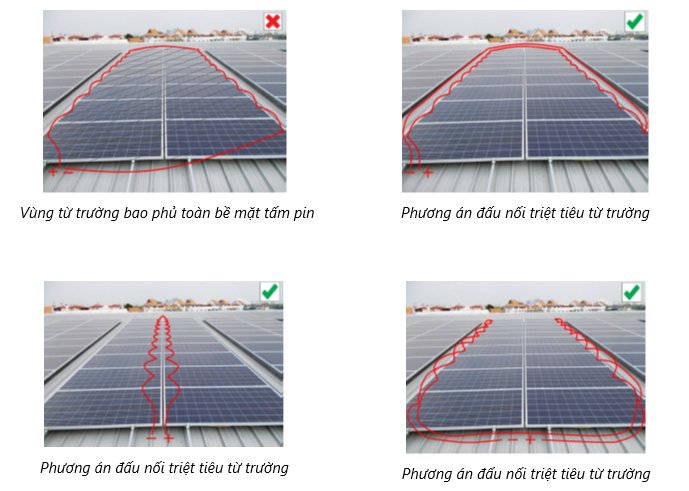
Hệ thống các tấm pin đấu nối tiếp sẽ tạo thành một vùng từ trường, trong điều kiện thực tế vùng từ trường có thể gây ra hiện tượng bám bụi ảnh hưởng đến khả năng hấp thụ bức xạ.
Việc đấu nối tấm pin nên xem xét đến kiểu đấu nối nhằm hạn chế tối đa vùng từ trường này. Dưới đây là một số ví dụ:
5. Hướng dẫn bảo trì và vận hành
Tham khảo bài viết giới thiệu dịch vụ O&M tại đây
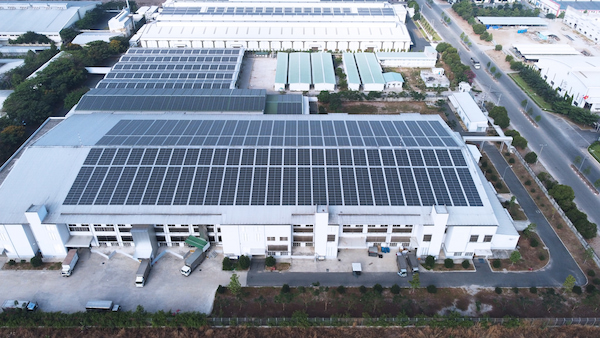
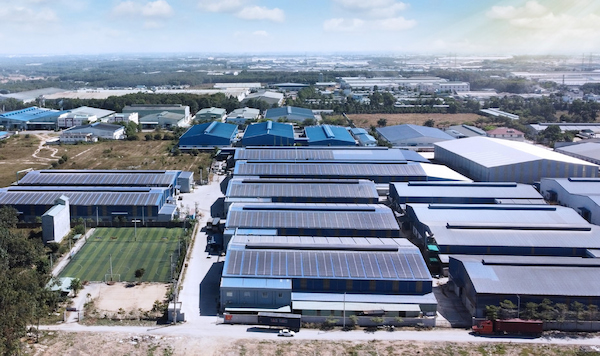
6. Dự án đã hoạt động
7. Bảng giá tấm pin năng lượng mặt trời năm 2026
Dưới đây là bảng giá tấm pin năng lượng mặt trời Astronergy Solar và Canadian Solar tại DAT Group (tham khảo từ nguồn web cập nhật năm 2026):
| Thương hiệu | Công suất (W) | Giá tham khảo (VND/tấm) | Ghi chú |
|---|---|---|---|
| Astronergy Solar | 575 – 590W | Khoảng 1.6 – 2.1 triệu | Giá tự lắp khoảng 1.6 triệu, có loại 2 mặt kính, hiệu suất 22%+ |
| Canadian Solar | Giao động 500W đến 700W | 1.25 – 2.5 triệu tùy model và công suất | Giá từ khoảng 2,500 VND/W, mức giá dao động theo công suất |
Thông tin chi tiết và giá cụ thể có thể thay đổi tùy theo thời điểm và số lượng mua. Để biết giá chính xác nhất, nên liên hệ trực tiếp DAT Group hoặc nhà cung cấp.
Năm 2026, xu hướng sử dụng điện năng lượng mặt trời đang ngày càng phổ biến nhờ chi phí lắp đặt ngày càng hợp lý và công nghệ phát triển. Chi phí đầu tư hệ thống điện mặt trời hòa lưới dao động khoảng 10-20 triệu đồng/kWp tùy theo loại thiết bị và quy mô hệ thống, với các mức phổ biến từ 40-45 triệu cho hệ 3kWp, 55-65 triệu cho 5kWp, lên đến khoảng 95-150 triệu cho hệ 10kWp. Đối với các hộ gia đình và doanh nghiệp đang tìm kiếm giải pháp tối ưu chi phí này, dịch vụ lắp đặt pin năng lượng mặt trời TPHCM của DAT Solar sẽ mang đến những gói cấu hình chuẩn kỹ thuật và ưu đãi nhất. Đầu tư vào năng lượng mặt trời không chỉ giúp giảm đáng kể chi phí tiền điện hàng tháng mà còn góp phần bảo vệ môi trường và đảm bảo nguồn điện ổn định lâu dài. Thời gian hoàn vốn thường dưới 7 năm với lợi ích kinh tế tích lũy lớn trong suốt vòng đời hệ thống.
Để đạt hiệu quả tốt nhất, người dùng nên lựa chọn nhà cung cấp uy tín và phù hợp với nhu cầu sử dụng thực tế. Nắm rõ bảng giá và các yếu tố ảnh hưởng sẽ giúp bạn hoạch định ngân sách đầu tư hiệu quả, góp phần thúc đẩy xu hướng sử dụng năng lượng xanh bền vững tại Việt Nam trong tương lai gần.